How Much Vinegar to Clean a Coffee Maker: A Practical Guide
Learn a safe, effective vinegar-based descale for coffee makers, with ratios, rinsing tips, and common mistakes to avoid. BrewGuide Pro.

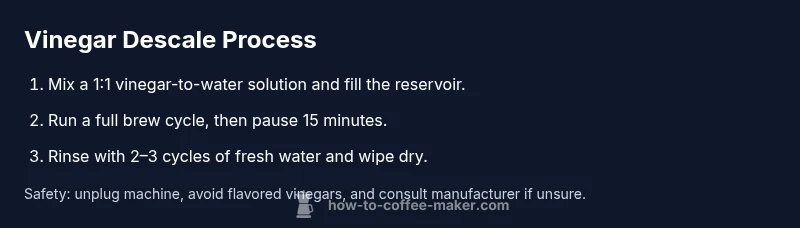
You will learn how to clean a coffee maker using vinegar. The core method uses a 1:1 vinegar-to-water descaling solution, run through the brew path, followed by several rinses with fresh water. This guide covers safety tips, alternatives, and how to avoid lingering vinegar taste. We’ll specify ratios, common mistakes, and how to reset after cleaning.
Why vinegar works for descaling coffee makers
Vinegar is a mild acid that helps dissolve mineral buildup caused by hard water. Over time, calcium and magnesium deposits can accumulate inside the heating element, piping, and hollow structures of a coffee maker. Cleaning with vinegar helps restore heat transfer efficiency and improve flavor consistency by reducing these deposits. Using a 1:1 vinegar-to-water mixture creates enough acidity to break down scale while staying gentle on common machine materials. As with any cleaning regimen, avoid flavored vinegars and ensure complete rinsing to prevent taste transfer into your next brew. In this section, we’ll walk through why vinegar is effective, how acidity interacts with different materials, and how to tailor ratios to your machine type.
Safety considerations and when not to use vinegar
Before you start, unplug the coffee maker and remove any removable filters or carafe. Vinegar is generally safe for most drip machines, but not all metals react equally; check your user manual for warnings about acid cleaners. Do not mix vinegar with chlorine bleach or other cleaners, as toxic fumes can form. If your machine has sensitive seals or aluminum components, test a small area or use a citric acid alternative. Flavoring agents, oils, or descaling solutions might interact with certain plastics; rinse thoroughly to avoid lingering odors. Finally, if your warranty prohibits home descaling, contact the manufacturer.
Vinegar alternatives for descaling coffee makers
Citric acid is a common alternative that some users prefer due to milder acidity and less scent. It dissolves mineral deposits similarly and may be gentler on rubber gaskets. Commercial descalers are marketed for coffee makers and often come with manufacturer-specific rinse instructions. When comparing options, consider water hardness, machine materials, and whether you want a fragrance-free clean. This section outlines the pros and cons of each approach and helps you choose based on your needs.
Choosing vinegar and proper dilution ratios
Most instructions recommend a 1:1 vinegar-to-water mix, filling the reservoir to the max fill line. For weaker mineral buildup or mid-range hardness water, some home users prefer a 1:2 ratio (vinegar to water) to reduce acidity. If your machine has a cleaning cycle, use it with the vinegar solution; otherwise run a full brew manually. Always start with a smaller batch if you are unsure and adjust in subsequent cleanings. The goal is to cover all interior pathways without leaving residues that could upset taste.
Preparing your machine for vinegar descaling
Wash the carafe and filter basket, then wipe the exterior with a damp cloth. Empty the reservoir, then fill with the vinegar-water solution up to the max line. If your coffee maker relies on auto-drip or a single-serve pod design, remove the pod holder to ensure vinegar can circulate. Place a clean carafe under the brew head and have towels ready for spills. This preparation helps prevent leaks and ensures thorough cleaning.
How the descaling process works (overview)
The vinegar descaling process targets mineral buildup in the water pathway, heating element, and tubing. Start by filling the reservoir with the vinegar-water mix and running a full brew cycle. If your machine offers a dedicated cleaning mode, use it for greater compatibility with internal components. After the cycle, allow a brief dwell time so the solution can work on stubborn spots, then proceed to the rinsing phase with fresh water until the aroma is neutral.
Rinsing and verification after vinegar cleaning
Rinse is the most critical phase to prevent any vinegar taste in coffee. Run 2–3 full cycles with only clean water, letting the machine complete each cycle before starting the next. If your model has a charcoal filter or water filter, replace or refresh it as needed after descaling. After the final rinse, brew a small cup of hot water to evaluate aroma and flavor neutrality before resuming normal usage.
Special cases: espresso machines and Keurig brewers
Espresso machines may have metal components that react differently to acids; check the manufacturer’s recommendations before using vinegar. Keurig brewers often require a manufacturer-approved descaler and multiple water-only rinses; avoid poolside tastings and ensure the machine is thoroughly rinsed to prevent lingering vinegar. For all special cases, refer to the user manual to tailor ratios and cycles without compromising seals or warranties.
Maintenance and prevention after cleaning
To reduce mineral buildup, consider using filtered water for all brews, and perform a light rinse monthly if you have hard water. Regular quick rinses after each use can minimize scale formation. Keep the reservoir and carafe clean with mild soap and warm water, and dry all surfaces to prevent mold or odors. A consistent routine extends the life of gaskets and seals and keeps flavor consistent.
Common mistakes and troubleshooting
Common mistakes include using flavored or unfiltered vinegar, skipping the rinse cycles, and using too much vinegar, which can leave a strong aroma. If you still detect vinegar after three rinse cycles, perform an additional two water-only cycles and brew a cup of hot water to test. If odors persist, inspect the seals and hose connections for leaks or residue, then re-clean as needed.
Tools & Materials
- White distilled vinegar(Plain, undiluted; avoid flavored vinegars)
- Distilled water(For diluting and rinsing)
- Measuring cup or pitcher(For accurate mixing if you’re not using max-fill line)
- Clean cloth or sponge(For exterior wipe-downs)
- Dish soap (optional)(Use only for initial wipe-down if needed)
- Towels or spill mat(Have handy for any splashes)
- Small funnel (optional)(For neat pouring into the reservoir)
Steps
Estimated time: 30-45 minutes
- 1
Prepare the machine
Unplug the unit and remove the carafe, filter basket, and any removable parts. Wipe the exterior with a damp cloth to remove dust or coffee residue. This step prevents contamination and sets the stage for thorough cleaning.
Tip: Holding the power switch off and unplugged reduces the risk of electric shock during cleaning. - 2
Mix the cleaning solution
Fill the reservoir with an equal mix of distilled water and white vinegar (1:1). Don’t exceed the max line. If you’re unsure about the acidity, start with a 1:2 ratio and adjust next time.
Tip: Use a measuring cup for accuracy if you’re not using the max-fill line. - 3
Run a cleaning cycle
Run a full brew cycle with the vinegar solution. If your machine has a dedicated cleaning mode, use it. Do not interrupt mid-cycle unless you notice leakage.
Tip: If the machine lacks a cleaning mode, a standard brew cycle will still work. - 4
Pause to let the solution work
After the cycle completes, allow the solution to sit in the system for 5–10 minutes to loosen mineral deposits. This dwell time improves descaling effectiveness without excessive acidity exposure.
Tip: Keep the reservoir cap off to vent any pressure and prevent spills. - 5
Rinse with fresh water
Flush the system with water by running 2–3 full cycles using only clean water. Repeat until the vinegar smell and taste are gone from the carafe and the air path.
Tip: Carry a second carafe to collect the rinse cycles and prevent spills. - 6
Test and finish
Brew a cup of hot water (no coffee) to confirm there is no vinegary aroma. If any scent remains, repeat a single extra rinse cycle. Reassemble parts and resume normal use.
Tip: If you detect any off-taste after multiple rinses, run an additional water-only cycle and re-check.
Questions & Answers
Can I use lemon juice instead of vinegar?
Lemon juice is acidic but may leave a strong citrus flavor and could interact with seals over time. Vinegar is generally more predictable for descaling. If you choose lemon juice, rinse thoroughly and monitor for any off tastes.
Lemon juice can work, but it might leave flavor remnants. Thorough rinsing is essential.
Will vinegar affect coffee flavor after cleaning?
If you rinse thoroughly with fresh water, residual vinegar is unlikely to affect flavor. Test brew with hot water to confirm neutral aroma before brewing coffee again.
Rinse well, then test brew with hot water to ensure no vinegar taste remains.
How often should I descale with vinegar?
Frequency depends on water hardness and usage. In hard water, consider monthly or bi-monthly rinses; in softer water, every 2–3 months may be sufficient. Always monitor mineral buildup and adjust accordingly.
Hard water means more frequent cleaning; adjust to your water and buildup.
Is vinegar safe for all coffee makers?
Most drip coffee makers tolerate vinegar, but some espresso machines have sensitive seals. Check the manufacturer’s recommendations before using vinegar and avoid if the warranty restricts descaling.
Most drip machines are fine with vinegar, but check your manual for espresso models.
What should I do if I have a Keurig?
Keurigs often require a manufacturer-approved descaler and specific rinse steps. If you choose vinegar, run several rinses with water and consult the manual to avoid damaging the machine.
Keurigs need special care; follow the manual and rinse thoroughly.
Watch Video
Key Takeaways
- Use a 1:1 vinegar-to-water mix for descaling.
- Rinse thoroughly with 2–3 water-only cycles.
- Avoid flavored vinegars and follow safety warnings.
- Test brew to confirm no vinegar taste before regular use.
- Maintain a regular rinsing schedule to prevent buildup.